Custom role in user management
Organizations that work with diverse resources need granular control over user access. Users require different levels of access to resources like monitors, features like dashboards and tags, and actions like changing account settings. Role-based access controls (RBAC) with defined Custom roles helps restrict such access. Custom roles allow users to have tailor-made access and permissions.
Default user roles like Admin, Super Admin, and Operator come with fixed permissions, which means those roles cannot be restricted to meet specific management needs. For example, a user working with website monitors might require a role to view server monitors but not edit them. Similarly, a system admin might only need a role that has access to the dashboard and reports. Custom roles address these requirements by enabling customers to create roles with precise permissions.
- Custom Role is available only for customers using Elite and Enterprise pack in Site4x7.
- For the Business Units, the custom role will be synced across all units.
Understanding user roles
When a new user is created or an existing user role is updated, a role is assigned to them. Select user roles from the Site24x7 User Role drop-down field, which includes System Roles and Custom Roles. System Roles comprise of traditional roles such as:
- Super Admin
- Admin
- Operator
- Read Only
- Billing Contact
- Spokesperson
- Hosting Provider
- Alert Contact
If you want to assign a unique role apart from the provided roles, use Custom Roles.
To access custom roles, follow the steps below:
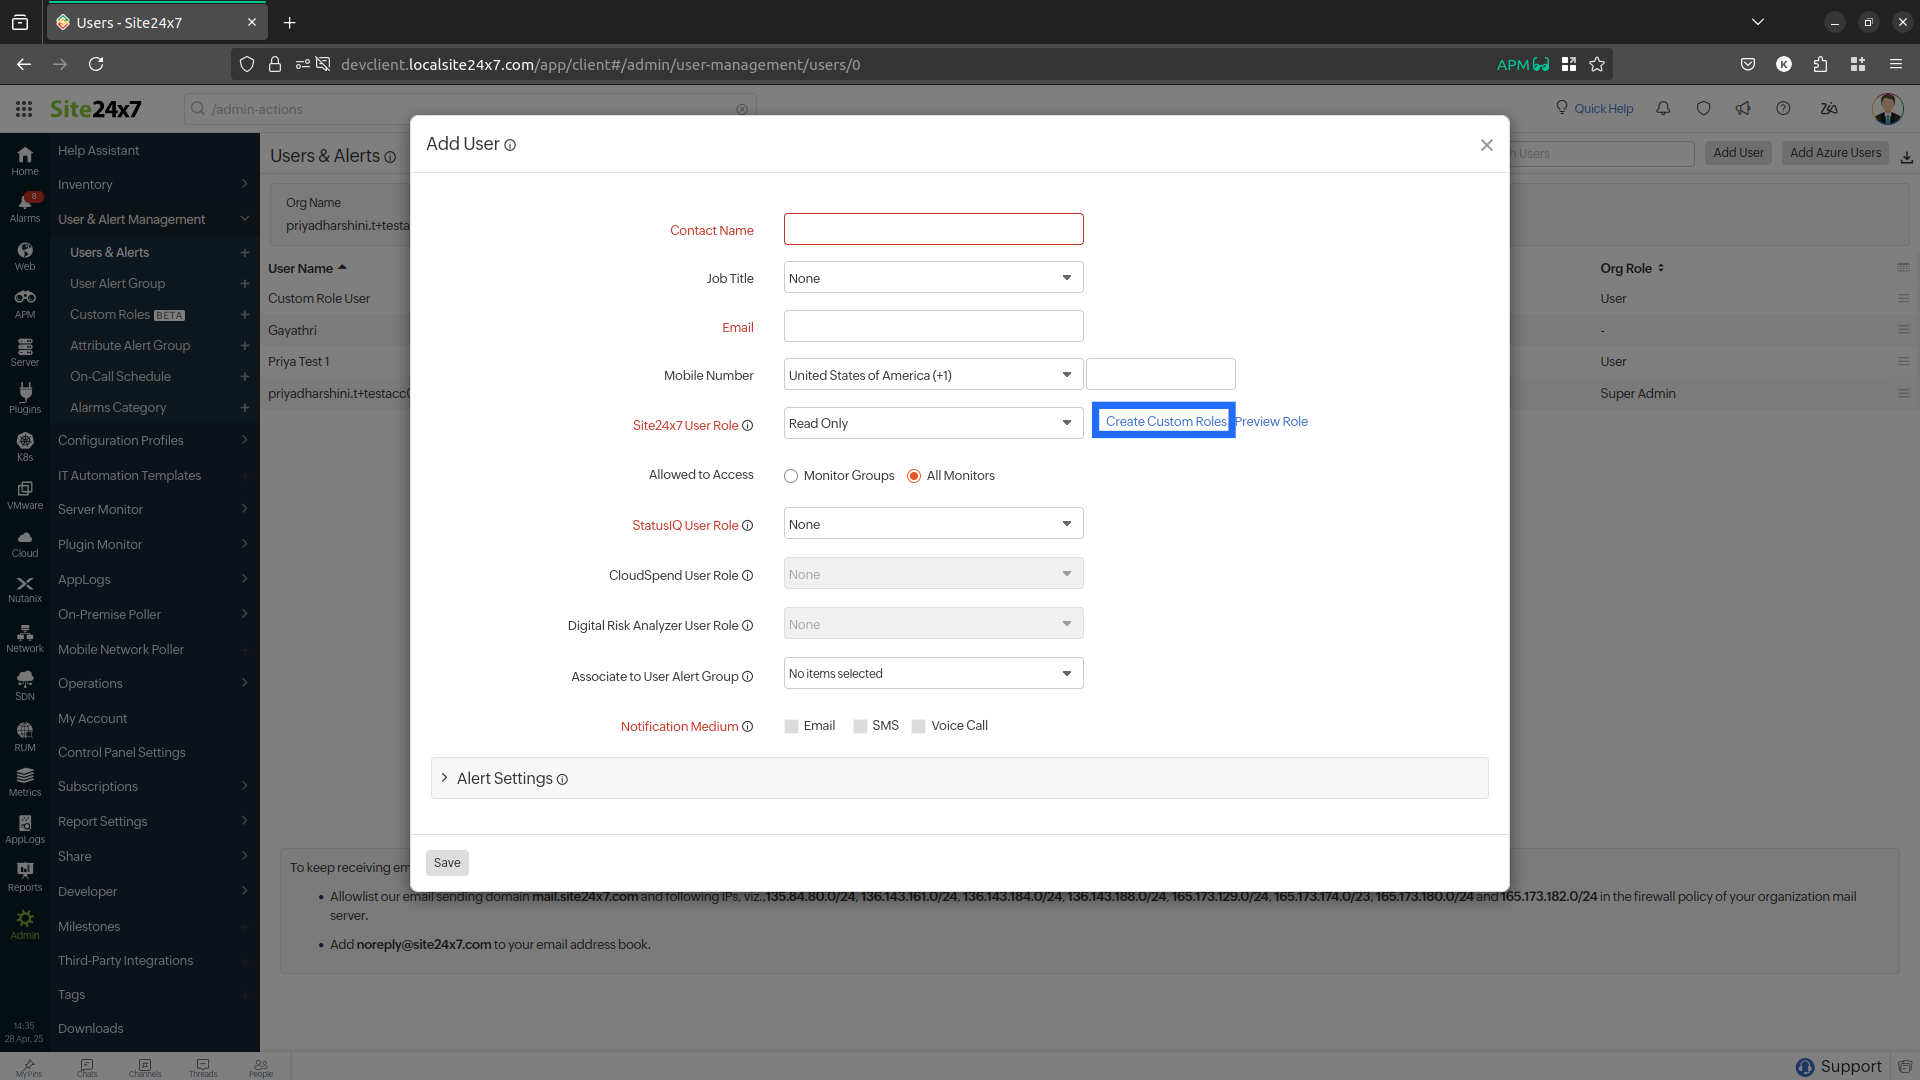
- Click Create Custom Roles near the Site24x7 User Role field. Otherwise, if there are other customized roles already available from the list, you can select from any of them.
- You can:
Adding new custom roles
From the Custom Roles page, a super admin or MSP admin can create a new custom role. To add new custom roles, follow the steps below:
- Log in to Site24x7.
- Navigate to Admin > User & Alert Management > Custom Roles.
- Click Add Custom Roles in the top-right corner.
- Fill up the following details in the Add Custom Role form that appears:
- Role Name: Give a suitable role name.
- Description: Provide a brief description of the role name, explaining its purpose.
- Permission Settings: Grant the required access for each module. The four types of permission settings are:
- All: Grant all permissions to all resources and configuration.
- Allowed: Grant all permissions to all monitors that a user has access to, as specified in the user’s form.
- Created: This is the same as the Allowed/All permission, but it is applicable only to resources and configurations created by the user.
- No Access: Deny permission to access resources and configurations.
NoteWhen the No Access check box is selected for a module, all permissions, including View, Write, and Delete, are disabled.

- We have four operations for each module:
- No Access: Check to prevent all access to modules and operations.
- View: Gives read access.
- Write: Gives access to make modifications to modules and operations.
- Delete: Gives access to delete the modules and operations.
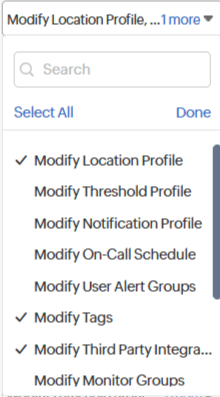
- Configuration: Select one or more options listed in the drop-down to add or update the configuration for the relevant modules. For instance, you need to select Modify Threshold Profile for Server monitors if you wish to make changes to the threshold profile settings of the desired Server monitor.
- After filling in the details and permissions, click Save in the top-right corner.
- Some fields are disabled to restrict specific permissions for the modules and configurations.
- When you choose Created permission for View, then Write permission will also be automatically changed to Created. However, when you assign View permission as All, you can set Write permission to All, Created, or No Access.
- When View permission is restricted, you cannot grant Write or Delete permission for a module.
- Use the collapse/expand all icon
 to shrink or expand all modules and sub-modules in the list of modules.
 - Use the search icon.
 to search for any particular module or sub-module.
Custom roles with Zia
Zia simplifies custom role creation by generating role permissions from natural language descriptions. Instead of manually configuring permissions for each module, you can describe the required access in plain English, and Zia will generate the corresponding role configuration.
Prerequisite
To create a custom role with Zia, add the Zia integration to your account.
Creating a custom role with Zia
To create a custom role using Zia:
- Navigate to Admin > User & Alert Management > Custom Roles.
- Click Add Custom Role.
- Click Create Custom Roles with Zia.
- In the text box, enter the required access levels and restrictions in plain language. For example, if you want to provide edit access to all monitor types in a user account but not provide any access to the billing section, your prompt can be: "Provide write access to all monitor types, but no access to billing".
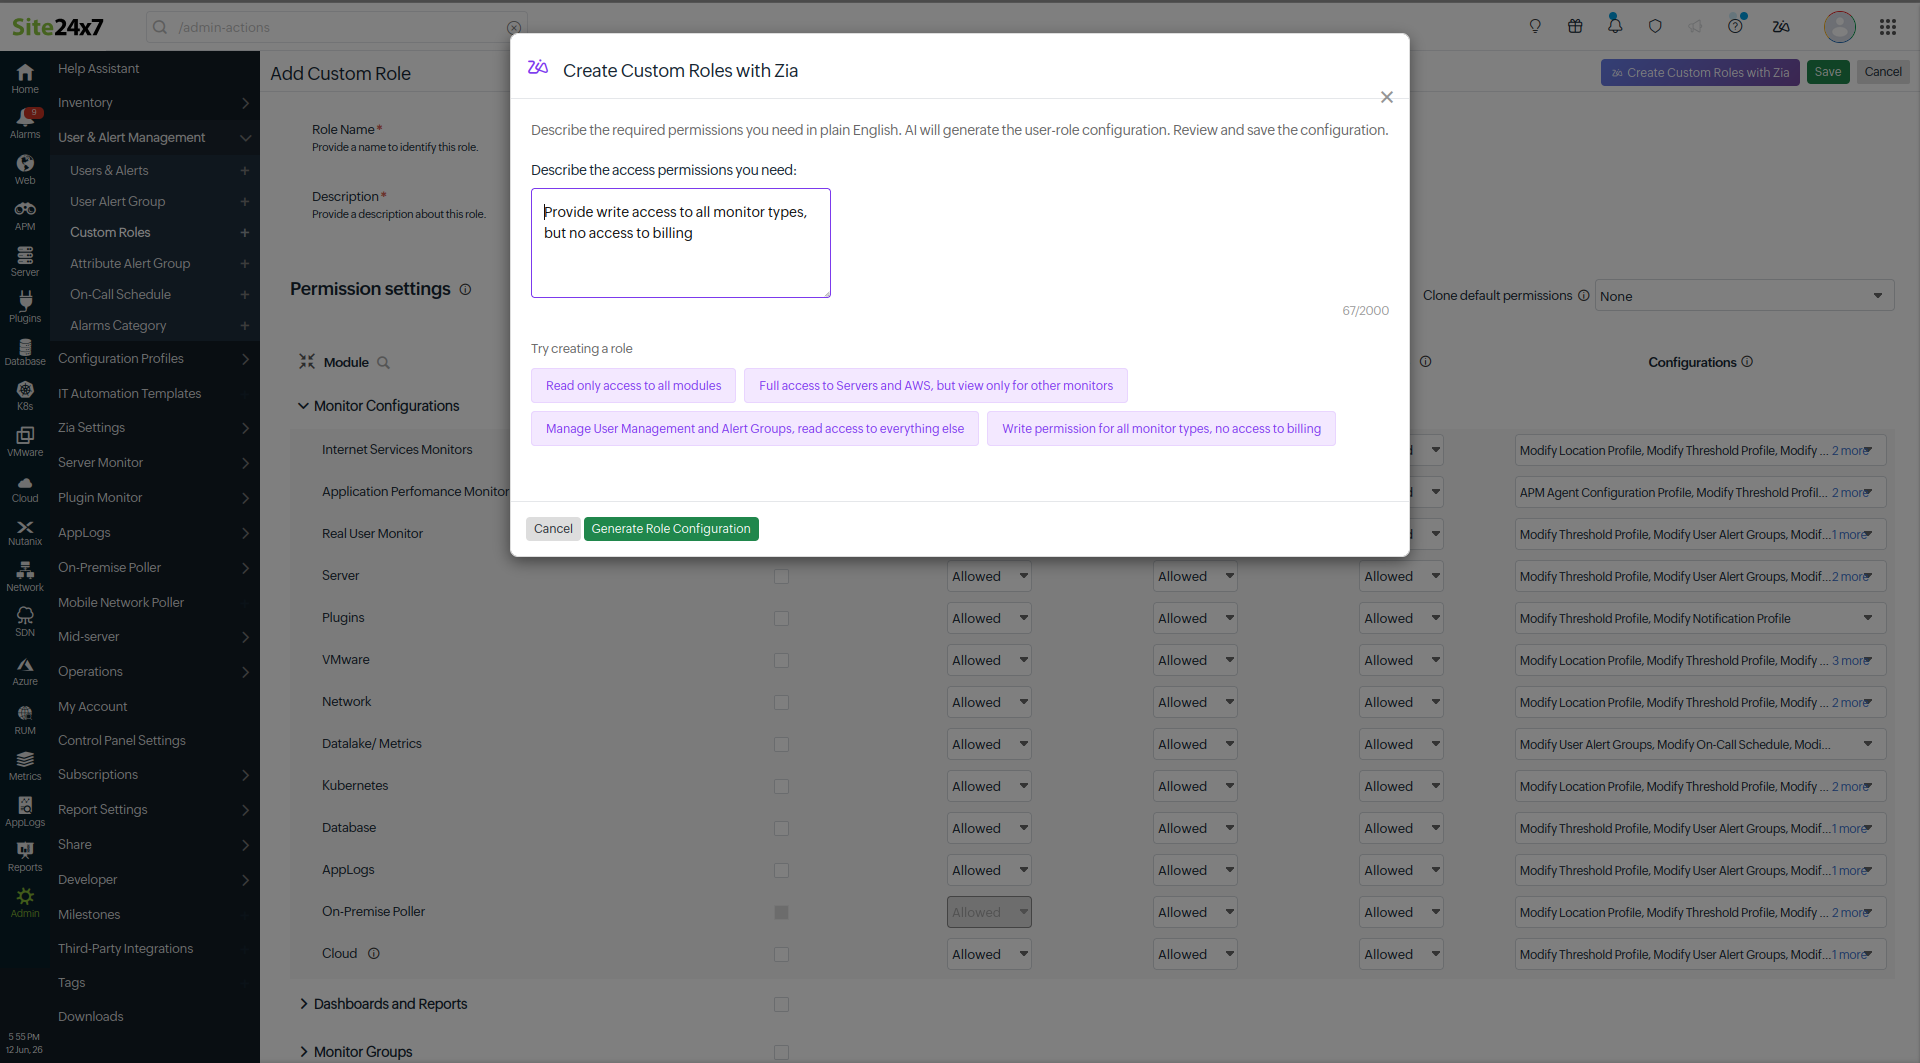
- Click Generate Role Configuration to populate the Create Custom Role form with the necessary access permissions. You can edit the Role Name, Description, and other permissions.
- Click Save. A Permission Summary will appear, briefing you of all the access permissions that will be granted for the newly created role.

- Review the permissions and click Confirm and Save to apply the generated permissions.
Example prompts
Here are some sample prompts to create a custom role with Zia:
- Read-only access to all modules.
- Full access to Servers and AWS, but view-only access to other monitor types.
- Manage User Management and Alert Groups, with read-only access to all other modules.
Custom role details
The list of custom roles of the existing users and their related details can be accessed on the Custom Roles list page that shows:
-
- Role Name: To identify the purpose and responsibility of the role.
- Description: To understand the role's scope and the purpose for its creation.
- Created By: To know who created the specific role.
- Last Updated: To know when the role was last updated.
Editing custom roles
On the Custom Roles page, you can edit, clone, view the associated users, or delete a user role. To perform any of the actions, follow the sequence of steps below:
- Click
 icon to the right of the custom roles.
 - The pop-up allows you to perform the following actions on the particular custom role:
- Edit:
- Select Edit to modify Role Name, Description, and access permissions allocated for the specific user role.
- On the Edit Role page, the Module Configurations, Dashboards and Reports, Monitor Groups, User and Alert Management, Configurations, Tags, Third-Party Integrations, Operations, and Device Key access permissions can be customized.
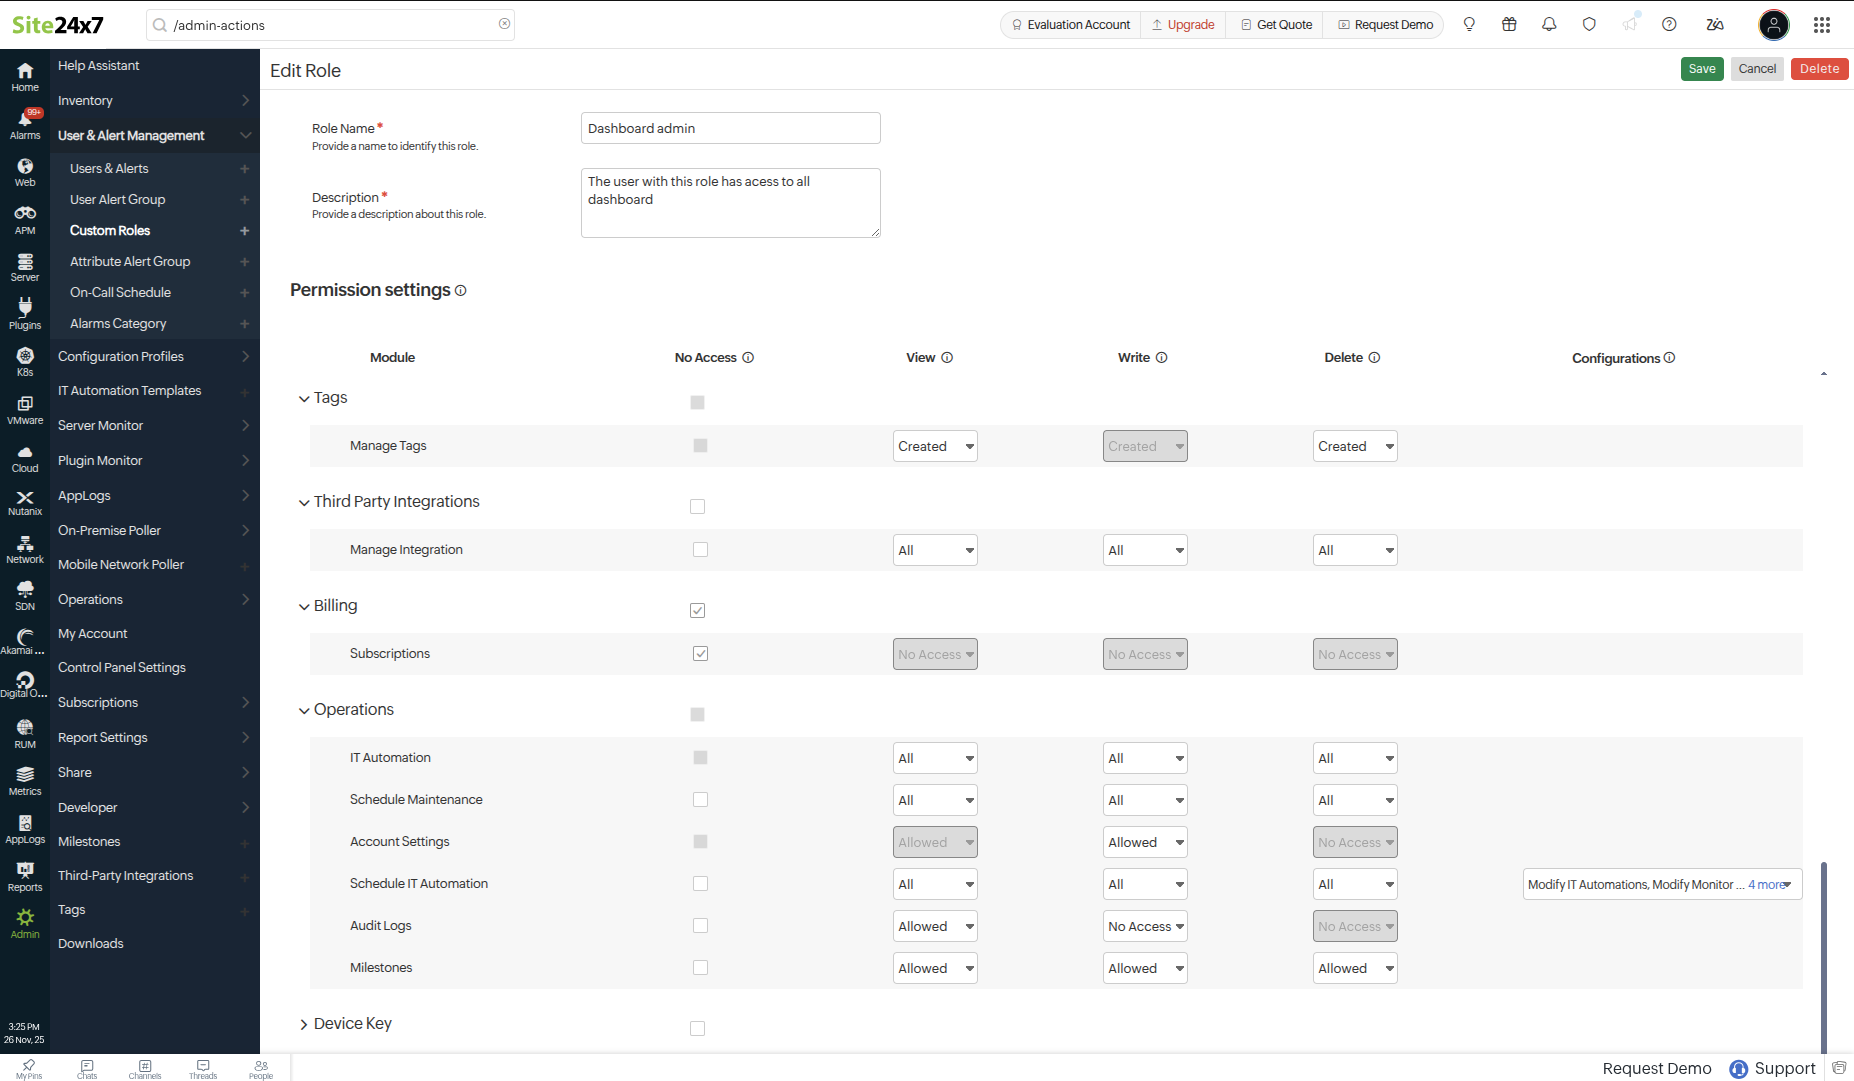
- Click Save to apply the changes made, or select Cancel to discard the changes.
- Clone: Select Clone to duplicate the same set of customized access permissions to multiple user roles. By default, the role name is set to the current user role plus "- clone". You can modify it to a more suitable user role.
- Associated Users: Displays a list of all users with the current user role. If no associated users are found, you can select them from the Users list page and click Add User.
- Preview Role: Choose to preview the access controls of a specific user role. This option provides insight on the actions users in a particular role can perform, their restrictions, and access permissions. While in preview mode, you cannot make or save any changes.
- Preview Role is available only for super admins and admins.
- You cannot preview a super admin role.
- Preview Role is available only when you have selected All Monitors in the Allowed to Access field.
- Delete: Select Delete to permanently remove the current custom role along with its configuration settings.
NoteYou can delete a custom role only if it is not associated with any existing users. To delete a custom role that is associated with users, you must disassociate it first.
Permission settings
Customize new roles for different Modules by assigning specific permissions to manage access. Prevent unauthorized access and maintain granular access control by assigning View, Write, and Delete access for the required monitors, tags, integrations, and other such features and configurations.
Monitor Configurations: You can assign permissions to control access to resources grouped as modules. You can also select different configuration settings that they can modify.
For example, a system administrator may require different levels of access for various types of monitors. They might need View and Write permissions for a server monitor, enabling them to modify configurations and troubleshoot issues efficiently. For a network monitor, they could have View-only access, allowing them to monitor network performance without making changes. Additionally, they may hold View access for a cloud monitor, enabling them to review its status and performance metrics while restricting any modifications.
For each resource, configurations—such as Modify Location Profile, Modify User Alert Groups, Modify Threshold Profile, Modify On-Call Schedule, Modify Notification Profile, Upgrade, Modify Tags, Modify Third-Party Integrations, Modify IT Automations, and Services—should be selected to allow the user to add or update their settings.
For example, to create a custom role responsible for notifications and alerts for all Internet Services Monitors, you can select Modify User Alert Groups, Modify On-Call Schedule, and Modify Notification Profile in the Configurations. The custom role user will have permissions to make changes to or delete the User Alert Groups, On-Call Schedule, and Notification Profile settings associated with all Internet Service Monitors.
Dashboard and Reports: Assign various permissions to the dashboard and reports, based on the user role. When assigning permissions to manage dashboards, users can view the widgets related to their permitted resources. You can allow the users to customize and schedule reports to enable users to generate and automate report delivery.
Monitor Groups: A custom role can have only Created or No Access permission for Monitor Groups.
User and Alert Management: A custom user role can be granted a varied level of access to User Management, User Alert Groups, and On-Call Schedule based on the organization's policy.
Configurations Profiles: Assign required permissions to various configurations profiles like Location Profile, Notification Profile, Threshold Profile, Business Hours, Email Template, Global Parameters, OAuth Providers, Web Tokens, APM Agent Configuration, and APM Key Transaction Configuration.
Consider a scenario where a DevOps engineer requires all permissions for APM Agent Configuration to manage application monitoring, along with View-only access to Global Parameters. A network administrator will need only View and Write permissions for the Notification Profile and Threshold Profile to configure alerts while having View access to Business Hours for scheduling alignment. Lastly, a compliance officer should receive View-only access to Email Templates, OAuth Providers, and Web Tokens to ensure compliance without making changes.
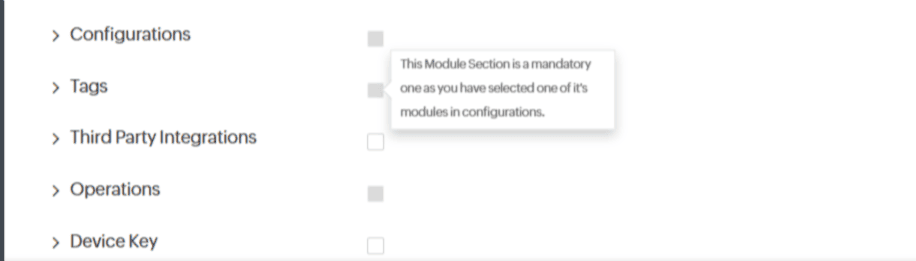
Tags: You can grant All, Created, or No Access to manage tags. You cannot check No Access for tags management if Modify Tags has been selected in the configuration of any module.
Third Party Integration: To manage Third-Party Integration channels, you can have All or Created access. You cannot check No Access for tags management if Modify Third-Party Integrations has been selected in the configuration of any module.
Billing: Granting access to the Subscriptions module enables users to view license consumption for all monitors, regardless of the module restrictions based on their custom roles.
Operations: To assign restricted access to users for sensitive actions like IT Automations, Scheduled Maintenance, Account Settings, Alert Logs, and Audit Logs, select varied permissions for each of the above actions. By granting permission to Configuration Rules, you can allow users to automate monitoring settings and standardize configurations across resources. To assign IT automation permissions, ensure that you have configured IT automation for the associated resources. All actions except audit logs have All, Created, or No Access. And for audit logs, you can assign Allowed or No Access permissions.
Granting access to the Audit Logs module allows you to view log details details for all monitors, regardless of any access restrictions defined in their custom role.
Device Key: Grant restricted access to Device Key Access, which is a unique authentication mechanism for Site24x7 agents and On-Premise Pollers. By controlling access to the device key, you can ensure that only authorized users can interact with and push performance metrics to the Site24x7 platform, keeping sensitive data secure and maintaining proper role-based access.
Use cases
- To allow dashboard management for all dashboards or only user-created dashboards: under Manage Dashboard, grant All or Created access, respectively, for View, Write, and Delete.
- To allow a user to view the dashboards created by any user but modify only the self-created dashboard: under Manage Dashboard, grant All access for View and Created for Write and Delete.
- To restrict a user access to one specific monitor category, like server monitors: under Manage Dashboard, grant All access to View, Write, and Delete for Server monitors and check No Access for all other modules.
- To prevent a user from accessing user and alert management, check No Access in the User and Alert Management section.
- To configure tag management for only user-created monitors, grant Created access for View, Write, and Delete permissions within the Manage Tags section.
- To restrict a user from IT Automation oriented operations, check No Access in the IT Automation section. They can no longer view, modify, or schedule any IT automations.
Assigning custom role to users
Once a new custom role is created, you can assign it to any user. Follow the steps below to assign a custom role to any user:
For a new user
- Navigate to Admin > User & Alert Management > Users & Alerts > Add User.
- On the displayed form, fill in all the details.
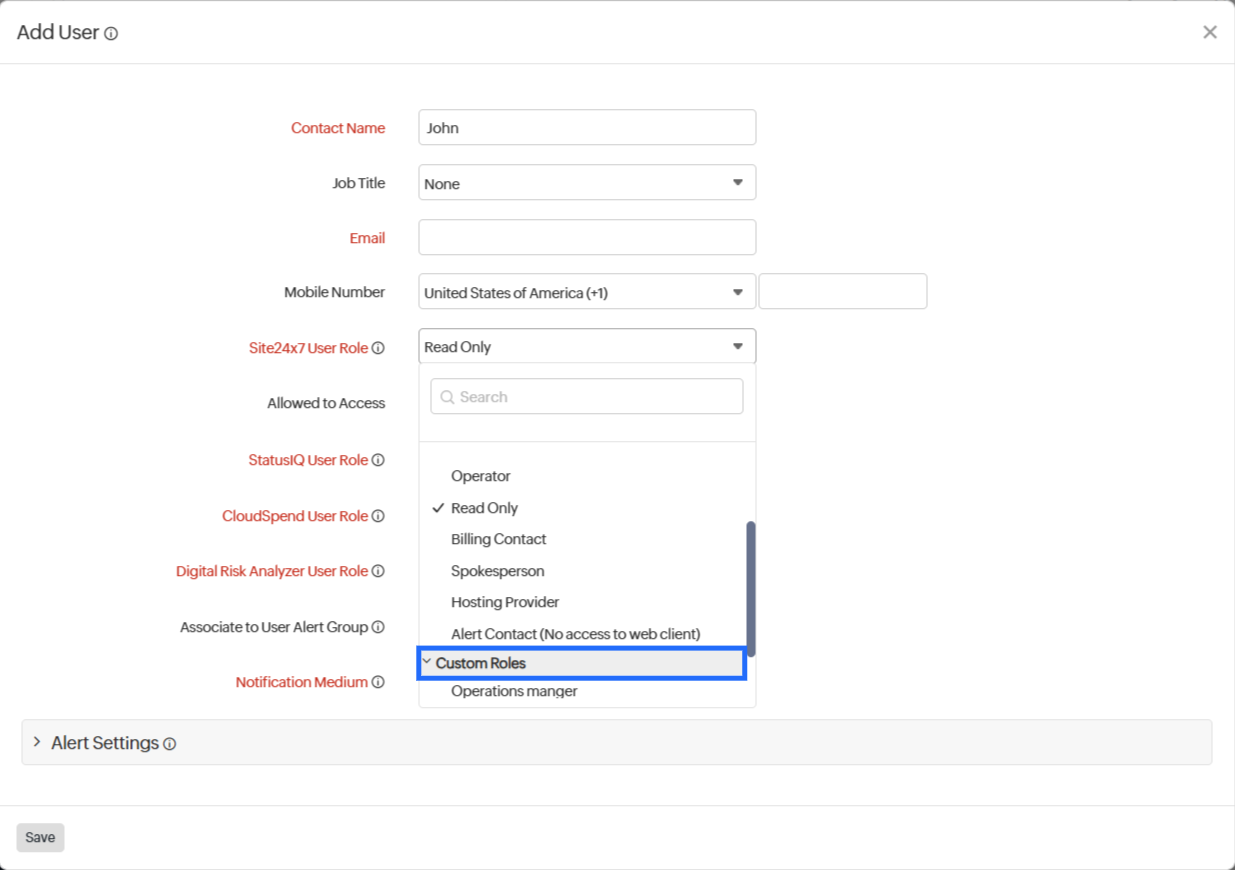
- In the Site24x7 User Role drop-down menu, the newly created custom role is listed below the Custom Roles.
- Select it to assign the custom role to a new user.
- Click Save.
For an existing user
- Navigate to Admin > User & Alert Management > Users & Alerts.
- Click the icon near any user details and select Edit.
- On the displayed form, in the Site24x7 User Role drop-down menu, the newly created custom role is listed below the Custom Roles.
- Select it to assign the custom role to the user.
- Click Save.
Dependent cases in the Custom Role form
Some settings in the Custom Role form are interdependent; changing one may affect others.
Case 1
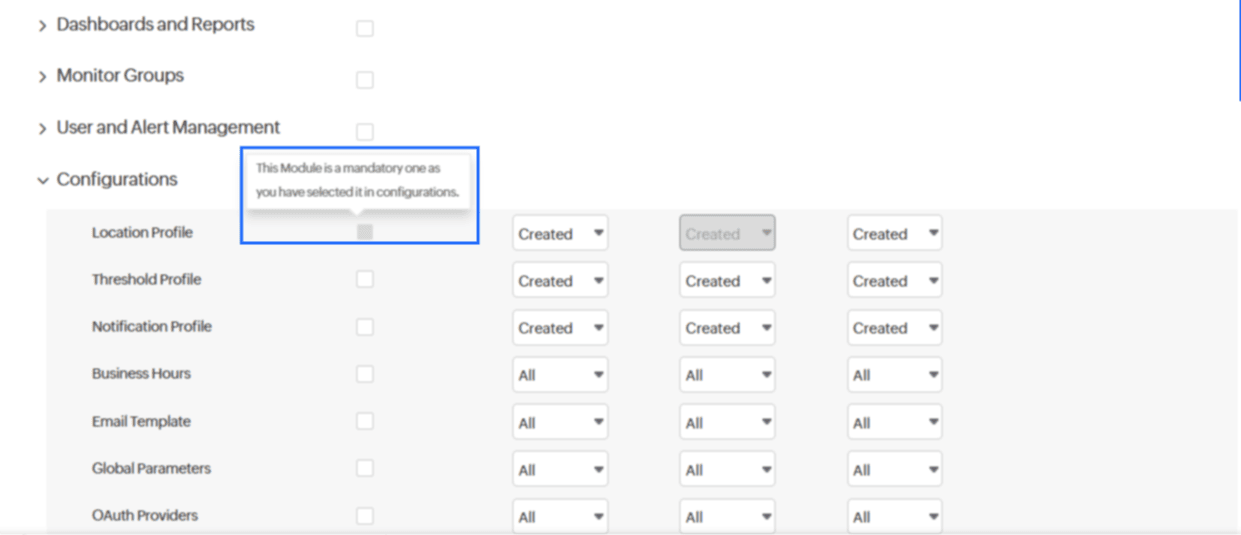
Any settings configured in Monitor Configuration cannot be subsequently set to No Access. For example, if Modify Location Profile is selected for Internet Services Monitors, the Location Profile setting cannot be disabled.
Case 2
The View and Write permissions for Schedule & Export Dashboards and Reports are linked; setting one automatically sets the other to the same value.

Case 3
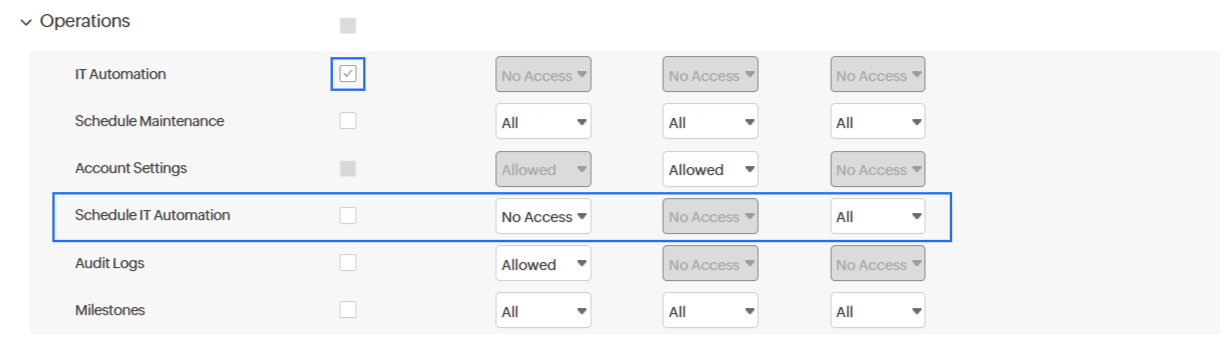
If No Access is checked for IT Automation, then Schedule IT Automation is automatically disabled.
Case 4
If you grant Modify Location Profiles, Modify Tags, Modify Third-Party Integrations, and other configuration permissions under Monitor Configurations, you cannot give No Access permission for the respective modules.